|
Written by Riley Conti, and posted in collaboration with Adobe Express 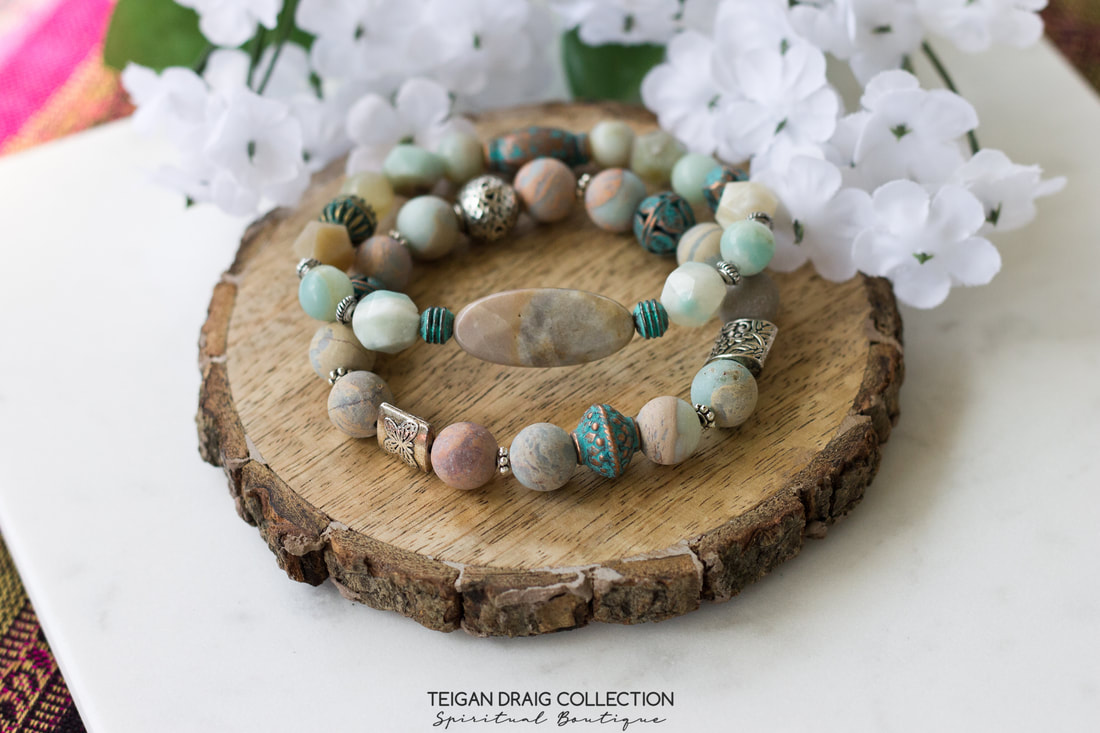 When it comes to running a successful business, having quality branding is essential. Professional photography is an invaluable tool to help tell your brand’s story and can be the difference between being noticed or overlooked in a crowded marketplace. In this blog post courtesy of Teigan Draig, we’ll discuss the indispensable role of professional photography in telling your brand's story. A Professional Photographer Understands The Power of Visuals When you hire a professional photographer, you are tapping into the aesthetic mastery that comes from extensive experience with light, composition, and post-production processes. They understand exactly how to capture beautiful images that will translate well for any type of media material you plan on using them for, such as magazines, billboards, or websites. No matter which mediums you use to connect with your audience, these photos will retain their consistency and quality. 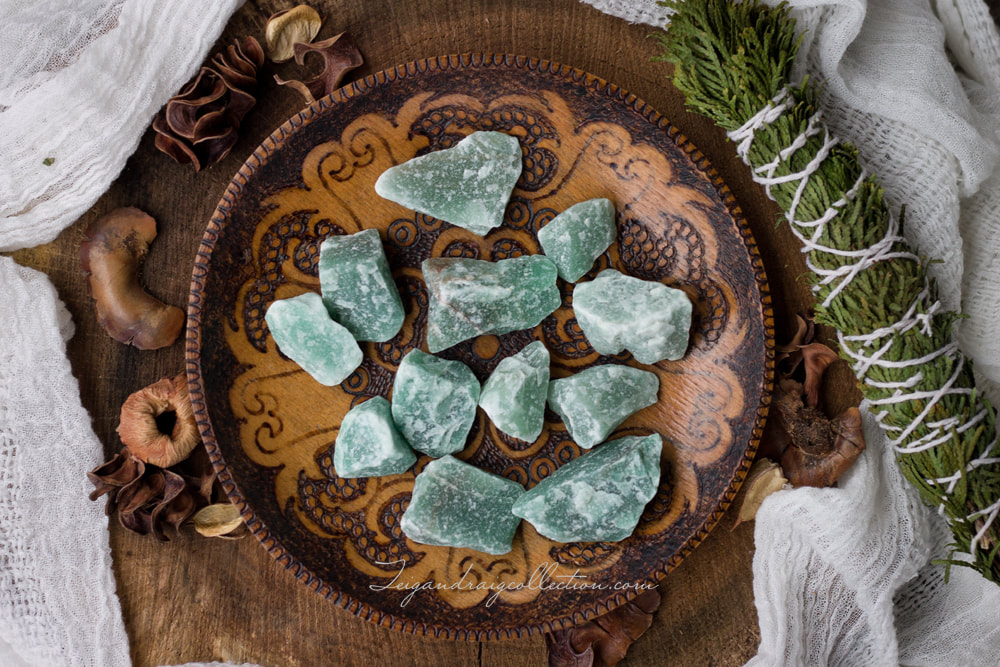 Ensure A Cohesive Brand Story Using a professional photographer helps ensure that all of your branding materials are consistent and look the same across all platforms. That way, there is no confusion for potential customers about what your brand stands for or what its values are. You also want to make sure that all of your branding photos have the same overall look and feel to keep everything cohesive and stand out from the rest of your competitors in the market. Pro Photographers Offer a Tailored Approach For Your Brand's Visual Story Professional photographers offer tailored approaches for telling your brand’s visual story through photography. They understand how to use different techniques to change up an image so that it tells a specific narrative to viewers. You can also work with a pro photographer if you need customized backdrops or sets created in order to visually represent certain aspects of your brand’s story. Master Photographers Use Strategic Storytelling Techniques The best professional photographers know how to strategically plan out their shots before they even touch their cameras. They will take into account various elements when setting up each shot so that they can tell a clear visual story with each photograph they take. This strategic approach ensures that every image has a maximum impact so that it resonates with viewers on an emotional level while still staying true to your brand’s identity and core messages.  With Your Finished Photos, You Can Use Adobe Express To Create Marketing Materials Once you get all of your photos taken from the shoot, you can use them to create various marketing materials, such as brochures or banners, using Adobe Express. These tools make graphic design easy even for non-designers! It's also extremely cost-effective, making it a perfect choice for business owners who need to stick to a budget. Here are a few examples of what you can make with Adobe:
Professional photography is essential for conveying who you are as a business and having effective branding campaigns across multiple platforms. A skilled photographer understands how to capture beautiful images with various techniques and strategies while also providing tailored approaches that bring out the essence of what makes unique brands stand out from their competitors. With finished photos ready at hand, additional tools like Adobe Express make it easier than ever before for entrepreneurs looking to create stunning marketing material.
Have a question for Teigan Draig? Reach out today and get in touch.
0 Comments
 Building a successful business requires hard work, dedication, and determination. It can be messy at times; exhausting, and stressful with long hours and annoying frustrations. But being a businesswoman is also deeply fulfilling, and brings a sense of inner joy, bold enthusiasm, and well earned accomplishment. Many women struggle with building a successful business while balancing family and social life. They often neglect to care for themselves in order to pour life, love, and energy into their businesses, and care for their families. All this give and no take many times results in disappointment, feelings of failure, and burn-out. There are many more women who give up their careers or business aspirations, than there are those who become successful. So what is the secret to successfully and effectively saving yourself while balancing business life with family life? The nourishing art of self-care.  Self-care is a vital daily practice for ALL women. It is especially necessary for busy, always on the go businesswomen. For these women it is crucial that they practice and truly embody self-care in mind, body, and spirit. We cannot give in any capacity if our wells are empty, but far too many women wait until the well has run dry to try to make it rain. Maintaining a healthy nourished well is easier, more productive, and more beneficial than trying to repair and fill a cracked dry empty well. Do you see why consistent daily maintenance through nourishing and fulfilling self-care is so important? I had the honor and pleasure of collaborating with three beautifully inspiring businesswomen and coaching colleagues on why the nourishing art of self-care is such a vital aspect of becoming a successful business woman. These are wonderful women whom I highly respect and deeply value. They each bring their beautiful and eloquent expertise to their respective fields, and truly embrace, own, and embody the essence of what it means to be a self-fulfilled women. Let’s dig in to what these inspiring influential women had to say. 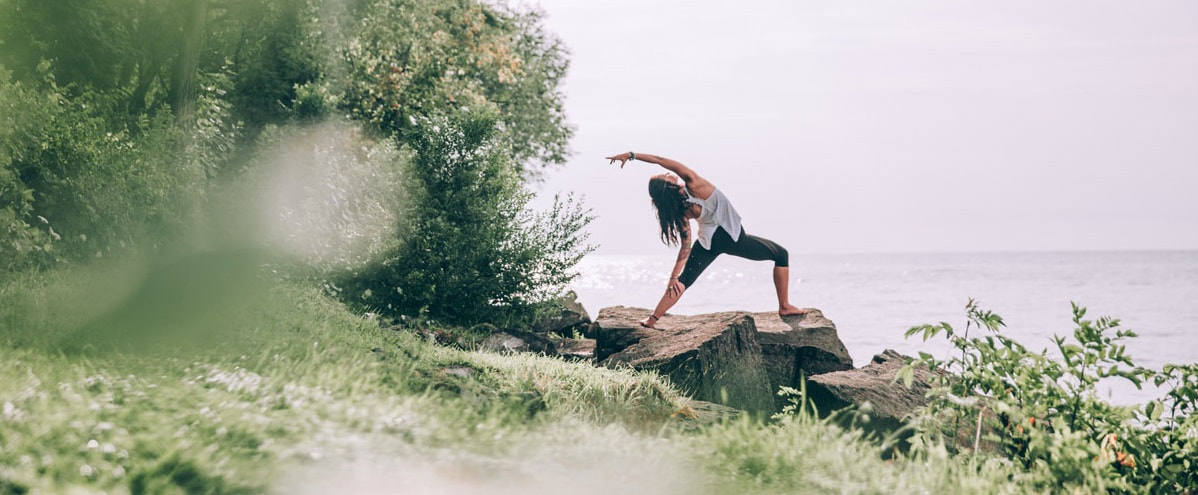 Tiffiny Brittain, a COPE Certified Health Coach, offers some inspiring insight on the importance of practicing self-care in regard to optimal health and wellness through proper nutrition, healthy movement, and making healthy daily living choices. I love her grounded gentle style and relatable approach to health coaching. She truly embodies her message of health, hope, and freedom, giving her clients and coaching team the tools, support, and encouragement to facilitate life-changing transformation in mind, body, and finances. She offers some encouraging insight into how self-care is a vital aspect of her daily life and in her coaching practice. During our interview below, Tiffiny shares her candid expertise. Self-care is taking care of one’s self physically, which then facilitates change emotionally and mentally. In your opinion, why is diet and proper nutrition a vital aspect of daily self-care? Tiffiny: “Our bodies aren't made to run on caffeine only! Proper nutrition is very important to keep your metabolism going. Many diseases are a result of improper nutrition. How you fuel your body determines your physical health. When you eat like crap, you feel like crap. Our bodies are designed to eat every 2.5-3 hours to keep our metabolisms functioning at the proper rate. When our metabolisms function at the proper rate this allows our bodies to maintain a healthy weight and keep energy levels high. That way you can eliminate mid-day crashes and fatigue. Fueling your body through proper nutrition is an essential aspect of daily self-care.” What words of inspiration can you offer business women on the importance of making time to take care of their health in mind, body, and spirit? Tiffiny: “Lead from the future, act in the now! Set goals that you want to work towards. Live as if they have already come to pass. Take the necessary steps to achieve those goals. Kick your fears in the face. Every business woman has fears about failing, not being able to adequately help people etc. I stood in my own way. To overcome that, I had to change my mindset on how I viewed obstacles that were in my way. Find something that motivates you to overcome your obstacles.” In your opinion, how does practicing self-care physically influence and encourage emotional and mental self-love? Tiffiny: “Your emotional and mental health is greatly influenced by your physical health. When you’re not happy physically, such as being overweight, experiencing a lack of energy, aches and pains, or possibly a medical issue, you become mentally and emotionally drained. These emotional and mental issues are often expressed as experiencing a lack of clarity or mental focus, no self-confidence, depression, or emotional exhaustion.Physical health encourages self-confidence. Your mental and emotional clarity begin to increase. You begin stepping out of your comfort zones, and doing things you never thought possible, or things you doubted yourself on. Being able to have the physical energy and emotional clarity to get up and enjoy life, and spend time with family doing the things you love is complete freedom.” Do you feel that by practicing daily self-care, you are also better able to serve your coaching clients? If so, in what ways do your clients benefit from you being a self-fulfilled women and coach? Tiffiny: “Practicing self-care has given me physical and mental freedom to pour into others because I myself am fulfilled. This trickles into how I run my business and also in my interactions with my clients and my coaching team. Accountability is key. When you hold yourself accountable in all aspects, and lead in your own health and life, others will follow with great success. When my coaching clients see me engaging in proper nutrition, physical activity, and self-care, they are then influenced to do the same. That in turn allows them to lead by example to others who are looking to them for inspiration and encouragement.” As a businesswoman, what are the top three daily practices in your self-care routine? Tiffiny:
Tiffiny Brittain on Facebook Tiffiny Brittain in Instagram  Self-care and spirituality often walk hand in hand. Incorporating your spirituality into your daily self-care practice can be enlightening, and deeply insightful in offering guidance and wisdom for daily life. Spiritual Business Coach and Mentor Leah Steele offers us a personal perspective on self-care, spirituality, and being a bold asset to those we serve through self-care and self-fulfillment. I absolutely love Leah’s fiery independence and direct approach to her coaching practice. She brazenly models for her clients the benefits of self-care to live in boldness, confidence, and expectation that we deserve to be successful and abundant. Leah shows us that incorporating our spirituality into our self-care practice opens the path to enlightenment, and offers a deeper connection to Source, which flows into every aspect of our lives, including our businesses. Leah has many eye-opening and cosmically motivating teachings, courses, and classes on wealth alchemy and money conditioning to help clients change their money story and manifest the life of their dreams. Leah offers her wisdom during our interview below. In your opinion, why is spirituality an integral aspect of daily self-care? Can you offer any tips or recommendations for busy entrepreneurial women on how to incorporate spirituality into their daily self-care routine? Leah: “Taking care of my soul and staying soul-aligned is my number one priority. If I’m not taking care of myself first, then I’m not able to show up fully in any of the other areas of my life. I schedule it into my calendar, just like I do a client session or a content call. Spirituality and soul alignment are a big part of my self-care routine. Daily journaling and meditation are non-negotiables for me. Even if I can only get 15-20 minutes, it happens! Most days I have an hour of journaling scheduled and I do an hour to 1 ½ hours of meditation 3-4 times a week. I take time every day to reset and connect to my soul. My soul is my direct connection to source, it’s important to nurture that so that my channel remains open and I’m able to get all of the divine downloads that are coming to me. Find the thing that makes you feel the most connected to Source and make sure you are doing those things several times a week, if not daily. It might be journaling and meditating like me, or it might be walking in nature. Even 10 minutes a day makes a huge difference. Make the time for yourself and you will see that quickly everything in life runs smoother and you have more energy for the million things you are managing!” In your opinion, in what ways can practicing consistent daily self-care in mind, body, and spirit benefit one as a businesswoman? Leah: “As a businesswoman you need to be sharp. Your intuition needs to be on point. Caring for yourself body mind and spirit enhances your work in every way. You will have more clarity and self-assuredness. You will make better decisions and have much better foresight.” Do you feel that by practicing daily self-care, you are also better able to serve your clients? If so, in what ways do your clients benefit from you being a self-fulfilled woman and mentor? Leah: “I only serve clients when my cup is full. They deserve me at my best. They pay me for my ability to see into the places they can’t. To tell it to them like it is and call them on their bullshit (can I say this...lol!). When I am walking the walk and not just talking the talk we have a more authentic connection. I only ask my clients to do work I have done and am willing to do myself.” Some women build businesses later in life. What are your thoughts on the beautiful process of coming into one’s own at any age, and how is self-care an important part of that process? Leah: “I’m 42 and I’m LOVING IT! My business has taken off in the past 2 years and I have the confidence to keep rising. I know myself, I’m sure of myself, and know my purpose on this planet. That all comes from an unwavering connection to my higher-self and Source, and THAT comes from practicing self-care.” What are your top three self-care practices you recommend to your coaching clients, and why? Leah:
Connect with Leah Steele online: www.theleahsteele.com www.facebook.com/theleahsteele 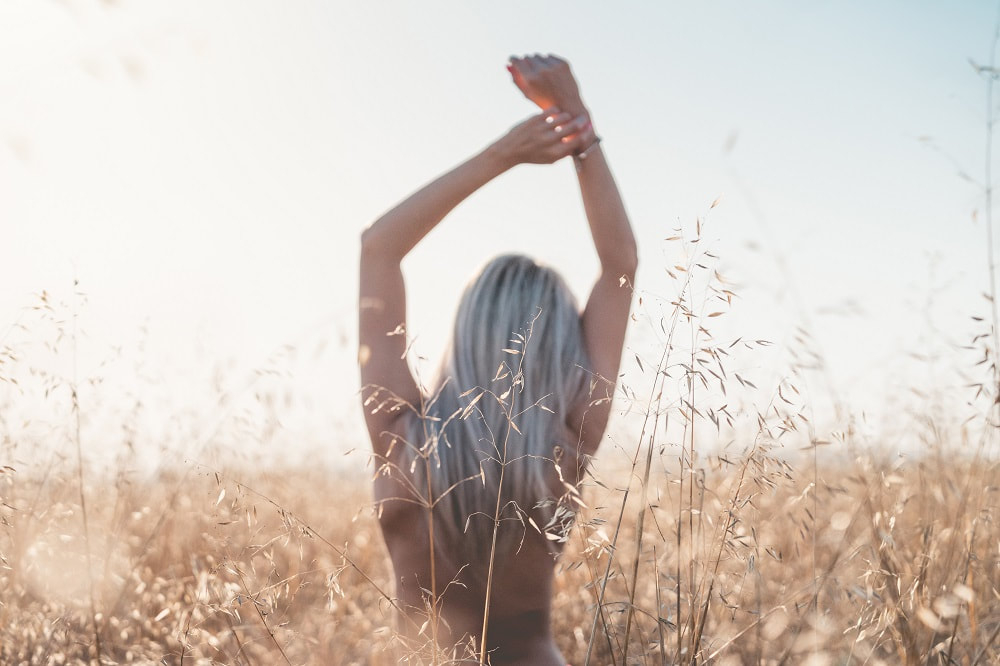 Businesswomen in the creative fields often have a unique set of struggles. Creative women are many times viewed as overly sensitive, emotional, and overthinkers. Creative women tend to view the world differently and feel things very deeply. In a world that has become harsh, cold, and insensitive, I am incredibly grateful for and blessed by the deeply feeling, peacefully gentle, and beautiful creative women in my life. Creativity as a form of nourishing self-love is often overlooked and undervalued. Author, composer, and artist Marlaina Donato encourages us to look to creative expression as a deeply nourishing form of self-care. Marlaina’s eloquent writings, enchantingly beautiful music, and delicate artwork reminds us that we are all creative beings with a connection to something that sets our soul on fire. She offers blissful and compelling insight into how creative expression can deepen our connection to self and to the inner chambers of our heart and soul, unlocking buried emotions and releasing them into the ether. During our interview below, Marlaina gently ushers me through her creative heart and woodland soul to reveal how self-care has shaped her into the Divinely guided woman she is today. Expressing one’s creativity is an often overlooked, but deeply fulfilling self-love practice. What are your thoughts on how expressing creativity can be a soul nourishing form of self-love? Marlaina: “I truly believe that our creative selves are the most authentic part of us, the part that is untamed by societal dogmas and is linked to the wilderness within. Nourishing this true self nourishes all other aspects of our lives because when we are creating, we are in a state of total honesty--bringing emotions from the shadows of denial, using our vision that is beyond time (the past or the future), and most of all, trusting ourselves. Creativity fosters self-trust, which I believe, is one of the most important things we as women can learn. As a business woman, how has practicing self-care been beneficial to you in withstanding the stress of building and maintaining your career? Marlaina: “For me, self-care goes well beyond what I do for myself physically. Emotional and energetic self-care has changed my life, and it’s taken me most of my life to arrive at that point. For me, the biggest stress of putting my work into the world - whether it’s been in book form or an album of music, a magazine article or a painting- has been anchoring my offerings in the old definition of success. Most people define success as having financial ease, a name associated with one’s work, and power of influence. Because of chronic illness, there were countless days and years when I was forced to take inventory while lying in bed, and on one of those days, I had a gentle epiphany that changed my life and mental health. I learned how to re-define success, something that took pressure off my psyche and my body. As I began to heal after decades, I started to really enjoy my life and creating in the moment with no thought of ambitions or goals, and ironically, that was when everything opened up for me.” What are your thoughts on the beautiful process of coming into one’s own at any age, and how is self-care an important part of facilitating that process? Marlaina: “I love this question because I believe that most of us--no matter where we are in life--are winging it up until our 40s or even beyond. I think we are so caught up in the idea that we have it together, trying to have it together, or making everyone believe that we have it together that we are too distracted to be our full selves. So, beginning a venture in midlife can be deeply fulfilling because that is when the opinions of others take a backseat to our passions that have been quietly waiting in the wings. It is also a time when we can admit to ourselves that we have needs and desires that no one else can fulfill but us--and we have a right to put ourselves on the priority list. This alone is self-care in action! And from that, anything is possible.” Many talented business woman struggle to build successful careers, and experience disappointment, burnout, and lack of self-confidence. Do you have any words of encouragement or inspiration on how self-care and self-love can benefit struggling business women who feel like giving up? Marlaina: “Self-love is key--and by self-love, I do not mean self-importance over others, but self-love that nourishes us in the most humble yet empowering way. With self-love, we can handle disappointment without bashing ourselves and it helps us realize that our “failure” is often times not anything we did wrong or not well enough, but timing. With self-love, we can recognize physical and mental signals that tell us when we need to rest. We give up when we are exhausted on any level, and sometimes, a good nap or a week of doing nothing can change everything. With self-love, our confidence is independent of validation or even profit. It remains steadfast, no matter what the climate happens to be.” Reflect for a moment on your younger self. What three things do you wish you had known then about practicing self-love that could have assisted you on the road to becoming the woman you are now? Marlaina:
Had I known these three essential things, I know for certainty that I would have had better health and spent fewer years in the prison of self-hatred.” Connect with Marlaina Donato online: www.AutumnEmbersMusic.com A deeply heartfelt thank you to Tiffiny Brittain, Leah Steele, and Marlaina Donato for your time and inspiring contributions to this project. Thank you for talking with me about the benefits of intricately weaving self-care into our daily lives in mind, body, and spirit. It has been a pleasure and honor to have this time with you. Thank you for pouring peace, love, inspiration, motivation, and encouragement into your service to others. I wish you all much continued success and the brightest of blessings.
Teigan Draig 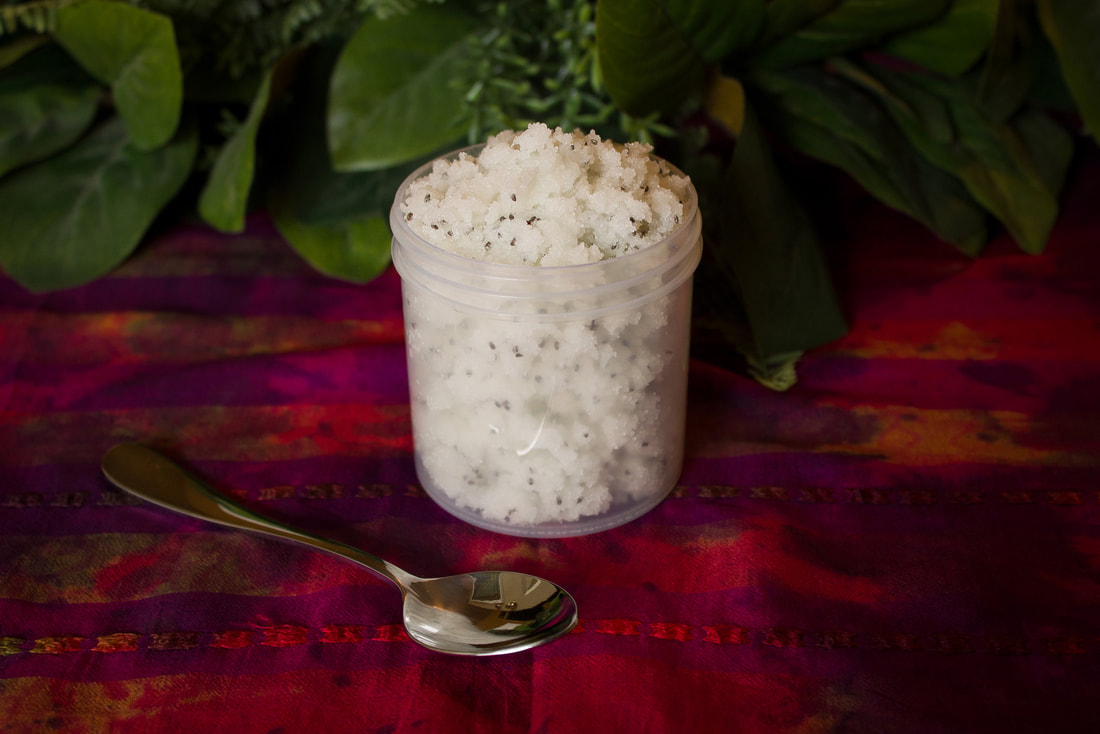 During dark winter days (well, year round actually) I long for tropical beaches and salty sea breezes. I crave the feeling of the warm sun on my face, the humid breeze in my hair, and the aroma of fresh oranges mingled with coconut oil; oh how I love that heavenly scent so often found in tropical places. Yes, I am a Florida girl living too far out of her blissful tropical element. During the winter months especially, I try to find ways to bring tropical elements into my home and surround myself with the familiar scents and feelings I long for. One of the ways I have done that is with my handmade Spiced Orange Sugar Scrub. This recipe not only brings the familiar scents of South Florida into my immediate space, but also moisturizes, exfoliates, and rejuvenates my dry thirsty skin leaving it feeling soft, smooth, and well hydrated. Whenever I use my Spiced Orange Sugar Scrub, the familiar scents of sweet coconut, juicy oranges, and warm hints of clove and cassia transport me to my childhood home of South Florida. I close my eyes, breath in these blissful tropical scents, and feel the warm golden glow of the sun kiss my face and the salty sea breeze blow lightly over my skin. I wanted to share this delectable and incredibly simple sugar scrub recipe with you.  For this sugar scrub recipe you will need:
Directions: Add sugar, chia or poppy seeds (or dried herbs if you are using them), essential oils, and carrier oil to the mixing bowl and mix lightly with a spoon to loosely combine. Add coconut oil and mix all ingredients well either by hand, or with a hand mixer until thoroughly combined. I prefer to use a hand mixer as this makes it easier to thoroughly combine all the ingredients. Hand mixing the ingredients for about 4 minutes adds air into the mixture creating a lighter and fluffier whipped sugar scrub. Once all ingredients are well combined to your desired consistency, transfer the scrub mixture to a sealed container. Your Spiced Orange Sugar Scrub is ready for use. I store my scrub in a tightly sealed container in the bathroom for easy reach when I want to use it.  To Use Your Scrub: Shower or bathe as usual. At the end of your bath or shower, rub a tbsp or two of the sugar scrub onto wet skin while still in the bath or shower, paying extra attention to problem dry spots such as knees, elbows, and feet. Use more or less of the scrub as needed or desired. Leave the scrub on the skin for a few minutes. Once finished, rinse off the excess sugar and herbs, and pat dry. The sugar and chia or poppy seeds lightly exfoliate the skin, removing dry dead skin cells, and the coconut oil and emollient oil stay behind on the skin to moisturize and smooth the skin leaving it polished and glowing. Use entire scrub within two-three months. Discard unused portion after three months. Enjoy the warm sweet scent of this sugar scrub while it nourishes your skins and whisks you away to tropical places. Brightest Blessings, Teigan Draig Follow Teigan Draig On Social Media You May Also Like  Energetic Shielding~ I often get asked about energetic shielding, and how to do it. There are many different ways to shield. A shield is simply a field of energy that one projects around one's self to keep negative energies from entering one's aura, or energy field. With much practice, you can even learn to project your shield a distance away from you to broaden your shield's reach. Like many others, the first way I learned to shield is with white light. Shielding with white light is simple to learn. How To Shield With White Light~ Find a quiet place where you can relax, and focus without being disturbed. Ground and center yourself and just spend a few moments clearing your mind and getting into a relaxed state. If thoughts enter your mind, acknowledged them and then bring yourself back to center. When you are centered and ready, begin focusing on your Crown Chakra. The Crown is located at the crown of your head, or just above it. Feel the energy there as it flows and swirls in this area. It may tingle, or feel like soft wind in your hair. This feeling can be different for everyone. For me, it is a slight tingling pulse. As you focus on this Crown energy, visualize it. See it in your mind's eye. For most people, it is visualized as White Light. See how it flows and moves. The sensation you feel may increase or even change as you become aware of the energy flowing out of your Crown. When you have a strong awareness of the energy at the Crown, will it to move up and around you. Allow it to flow up out of your Crown. Focus on how it feels, visualize the White Light energy flowing down around you, encasing you. It doesn't have to be a bubble shape, though many see it as that. For me it was not a bubble, but a flowing, changing energy field that stayed close to my body. If I moved, it moved. Now feel the White Light as it flows down over your shoulders, torso, and finally down over your legs and feet. You are now fully encased in protective White Light. Spend some time just feeling the energy as it moves over your body. Play with it. See yourself inside the flowing, shifting white energy. It looks like white light, but it is energy. FEEL IT. SEE IT. This step is important, as shielding with White Light is about more than just visualizing it. You need to experience how the energy feels too. Spend as much time as you like in this state. Practice often, even daily, with this technique. Soon you will be able to use it at will. With practice, you will be able to White Light shield faster and more effectively. Once you master White Light shielding, other types of shielding will come easier. My main point in teaching you to White Light shield with this method is for you to learn to be AWARE of your own energy; to really experience feeling it, to see it, and to begin learning to manipulate it. Please feel free to leave your thoughts and experiences. Did you find this method easy? Was it effective for you? What other questions do have about shielding with White Light? I'd love to hear from you and help you grow. In my next post I will talk about how to strengthen your shield. Brightest Blessings, Teigan Draig Follow Teigan Draig On Social Media  Listen Lovely, we need to have a little chat. I hear it every day, and I was even guilty of it at times. "Hey girl, you got this!" "Hey girl, how's it going?" "Hey girl, let's plan a lunch date." Hey girl..." GIRL?! Ok, stop. I am not a girl, or his girl, or your girl. I am not a child. I am a grown woman; a Queen who runs her castle by her damn self. I know my worth, and I'm confident in what I bring to the table. I think women need to stop being girls. Women need to step into their power and be Queens. What does it mean to be a QUEEN? To be a Queen means: ~ To know your worth and that you have value. ~ To walk with poise, eloquence, and self-respect. ~ To be kind, just, and pure of heart; treating all you meet with fairness and grace. ~ To love and care for yourself. A Queen know she cannot pour from an empty cup. ~ To leave people in better condition than how you found them. ~ To know how to love unconditionally and without exceptions, but also knowing when to set firm boundaries. ~ To fiercely protect the ones you love and to stand for those who have no voice. ~ To be true to yourself and live from the soul. ~ To rise from the ashes of failure, disappointment, and pain with humility, determination, and strength. ~ To know that the seat of your fire (personal power) resides in the true soul. ~ To step with confidence in all you do knowing that you have the skills, abilities, and wisdom to achieve your dreams. Now my lovely, you are not a girl. Straighten your crown and run your castle like the QUEEN you are. Follow Me On Social Media  You see, I wasn't always a fire breathing dragon who lived in balance fully aware of her true self. In my younger years and into adulthood, I didn't know who I was. I placed my identity in other people. I craved validation and placed far too much weight on the opinions of others. My ego (the face I showed the world) could be cold and heartless, but warm and loving. I lacked any kind of self-worth, self-confidence, or purpose. I felt like a reed swept up in the wind, blowing here and there, but never settling in one position or another. I was a hott mess inside, because I did not understand that the true seat of my fire, the resting place of my personal power, resided in the depths of my soul. For most of my life I tried to fit inside a box that the religion I was raised in constructed around me. I longed to be FREE, but FEAR held me there. If I stepped out of line, I was going straight to HELL. I left that religion and became a wanderlust studying and dabbling in other faiths and belief systems. I saw that many of them aligned in various ways. They all had different "terms" they used to refer to the same thing. I began carving my own path, an eclectic mix of paganism and what I call "Universal Spirituality". I am an Omnist, if you will, one who sees the good in all faiths and choosing not to align myself with any one belief system or religion. I incorporate aspects of many different religions into my path. If someone were to ask me what my faith is, I would simply say: Draconic Grey Witch. What exactly is a Draconic Grey Witch? That is discussion for another time. It was on my current path that I was able to find my fire and really step into my personal power. I realized that my TRUE identity lies within myself. I found the FREEDOM to be who I AM. So, who am I? I am beautiful, magickal, creative, trustworthy, honest, kind hearted, and honorable. I am a QUEEN and I run my castle with grace, love, integrity, peace, and harmony. I take no shit, and those who would seek to harm me, or those I love, in any fashion are met with eyes of fire and breath of flame. I am kind and gentle, and full of peace, love, and light, but do not trifle with me or those I love, for I am also the most viscous and relentless creature you have ever known. And yes, I realize that is a little scary, but that is okay. I will walk in both the whitest light and blackest night, for I know what it is to be balanced. Even nature itself is a balance of light and dark, black and white, Yin and Yang. And oh what a beautiful thing it is. Please feel free to introduce yourselves in the comments and share a little...or a lot about yourself. I'd love to get to know you too.  Follow Me On Social Media In an already saturated online market, you need to put your best foot forward. When shoppers visit your online shop or store, the product photos will determine the shopper's first impression of your product, your brand, and the quality of the products and services you offer. Ah yes, that carries a certain amount of weight to it, now doesn't it? When shopping online, you don't get to touch the product, or view it in person. You have to rely on the photos and product description to tell you everything you need to know about the item. You count on that item being accurately represented in the photos you are viewing and in the description you are reading. This is why good product photography is of great importance when selling anywhere online. 3 Common Mistakes That Ruin Product Photography Many of you know that I make handmade jewelry and herbal skin care products, but what you may not know is that I am also a professional photographer. I attended Savannah College of Art and Design majoring in photography. Photography is a huge part of my life and it is important to me to produce photos that accurately represent the items I make and sell. As an online seller, 90% of my marketing and selling is done online. Like many online sellers, I use social media to market and sell my products. I also maintain several websites on which to sell my products and services. Facebook and Instagram are the main social media outlets I use to market and sell. I come across countless posts from fellow sellers who are also using social media to market and sell their goods and/or beautiful creations. I have noticed 3 common mistakes many sellers are making when photographing their products for sale online: images that are out of focus (blurry), improper white balance (do not show correct color), and images that are under exposed or over exposed (too dark or too light). These are all too common mistakes that are easily fixed with a bit of basic photography education. You don't need an expensive interchangeable lens DSLR camera to take great product photos. A good point and shoot camera can get the job done nicely. It's even possible to get decent photos with a good cell phone, although I do recommend a using a good camera for best results. Achieving Proper Focus - Don't Be Just A Blur  Clear, sharp images best showcase any product. Images that are blurry are unattractive, and do not clearly show the details of the subject. Many focus issues are caused by camera shake when hand holding the camera. Some focus issues are caused by incorrect aperture (shallow depth of field), but the subject of aperture is a bit more complicated than what I want to discuss in this article. Let's start with camera shake, as it is usually the issue and is the easiest to fix without more in depth knowledge of photography. Camera shake is movement of the camera when the shutter button is pressed, most often caused by unsteady hands and improper body position. The best way to fix this is to shoot with a tripod. There are many small inexpensive tripods available on the market today. A quick Google search brings up many results. You can even find tripods for use with cell phones. A tripod greatly eliminates camera shake by holding the camera securely so the camera does not shake or move when the shutter is pressed. It is not impossible to get clear in focus images when hand holding the camera. Body position, camera holding technique, and having a steady hand all help one achieve proper focus when shooting hand-held. Hold the camera in both hands and look through the view finder rather than using the screen on the back of the camera. Hold your elbows close to your sides and lean or prop yourself on something to help keep a stable position while moving as little as possible. This allows you to use your body and correct hand position to keep the camera steady when the shutter button is pressed. Many photographers, myself included, hold their breath the moment the shutter is pressed to even further reduce movement of the camera. Shooting with a higher shutter speed also helps prevent out of focus images. A higher shutter speed allows for more stop motion by increasing the speed at which the curtains close when the shutter button is pressed. A study of how the camera works and the exposure triangle would be of benefit here, but that is a topic for another time. I don't want to induce information overload, so for now, I'm keeping things simple. Below is a graphic that shows a simplified outline of the exposure triangle for those who may be curious. 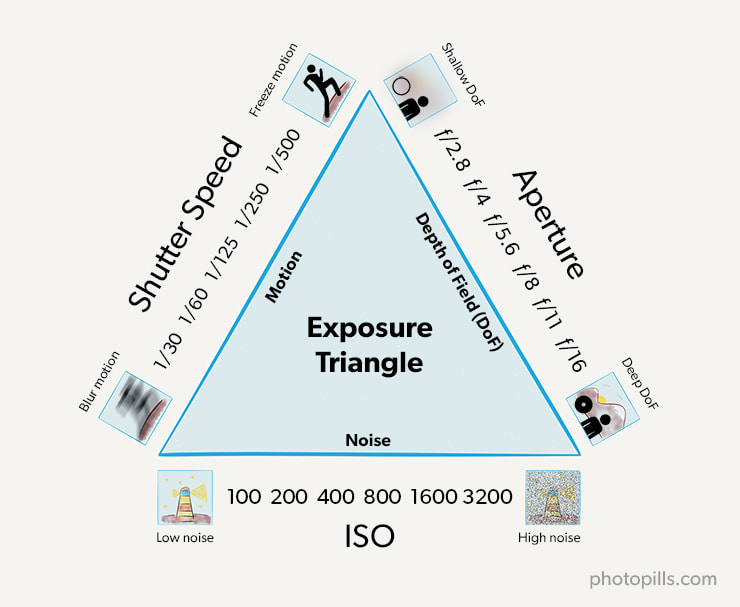 White Balance - Achieving Correct Color The main culprit of incorrect color in photographs is improper white balance. Improper white balance can actually change the color of a photograph and make the color of the subject being photographed appear different than it really is. 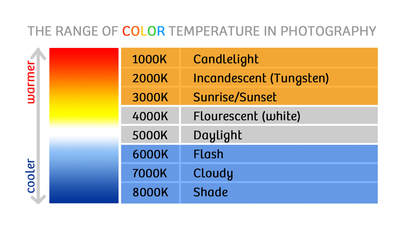 The temperature of light is measured by the Kelvin scale. The light in a shaded area or on a cloudy day is blue, or what is considered cooler in temperature. Daylight is white and is considered neutral or natural. Sunset, sunrise and tungsten light is yellow, orange, or red, or what is considered warmer in temperature. Many point and shoot cameras have a setting called AWB which stands for auto white balance. AWB means that the camera evaluates the available light and determines what color temperature to capture the image in. The problem is that many times the camera gets it wrong and accurate color is not achieved. When shooting outdoors in cloudy or overcast conditions, use the white balance setting represented by the shape of a cloud. This setting can also be used if shooting in shade if your camera does not have a separate setting for shade. When shooting outdoors in full sun, use the daylight setting. If shooting indoors under tungsten or incandescent light, use the tungsten or light bulb setting. If shooting under fluorescent light, use the fluorescent or radiating rectangle setting. See image below. If using the flash, use the setting for flash. Most cameras all use the same symbols to represent the white balance settings, but you may need to consult your camera owner's manual find out your camera's white balance symbolism.
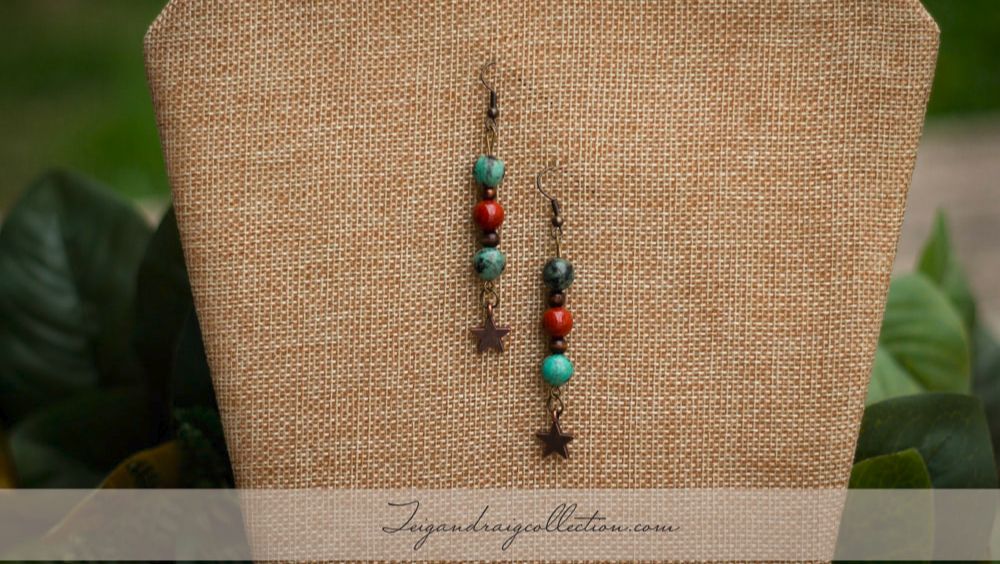
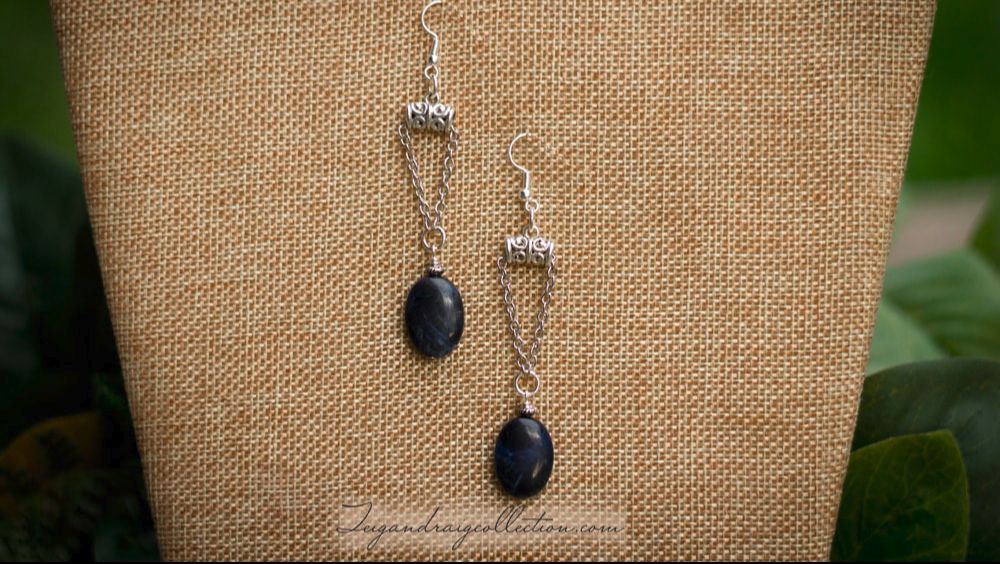
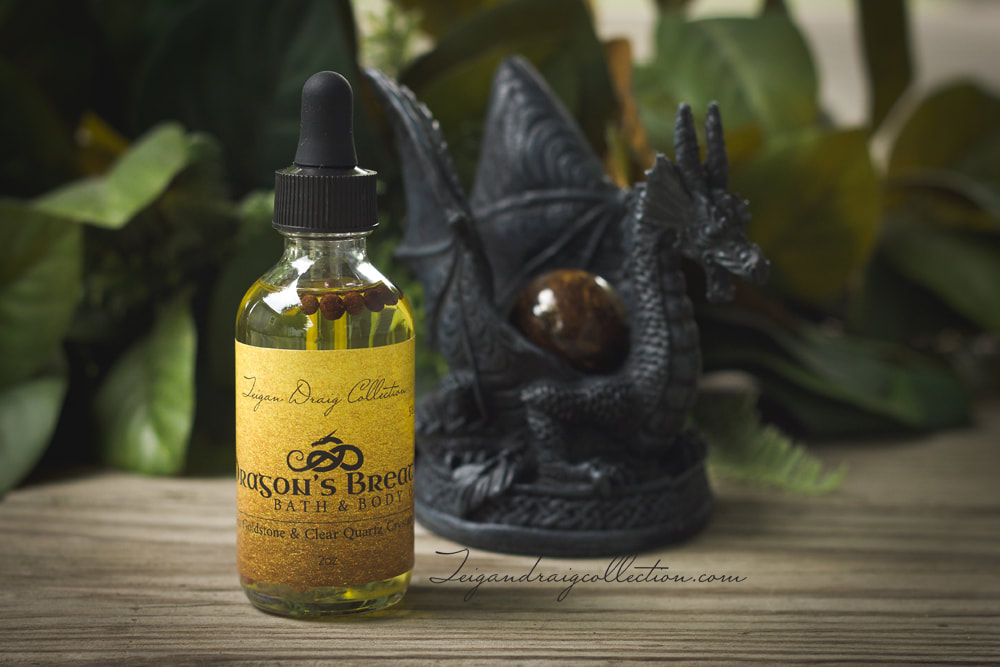
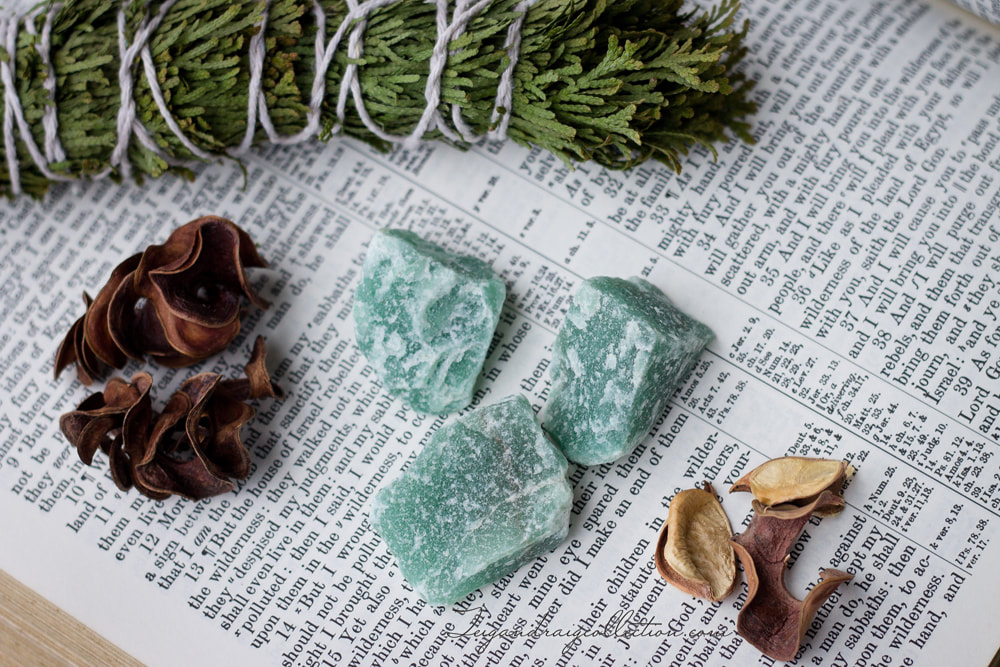
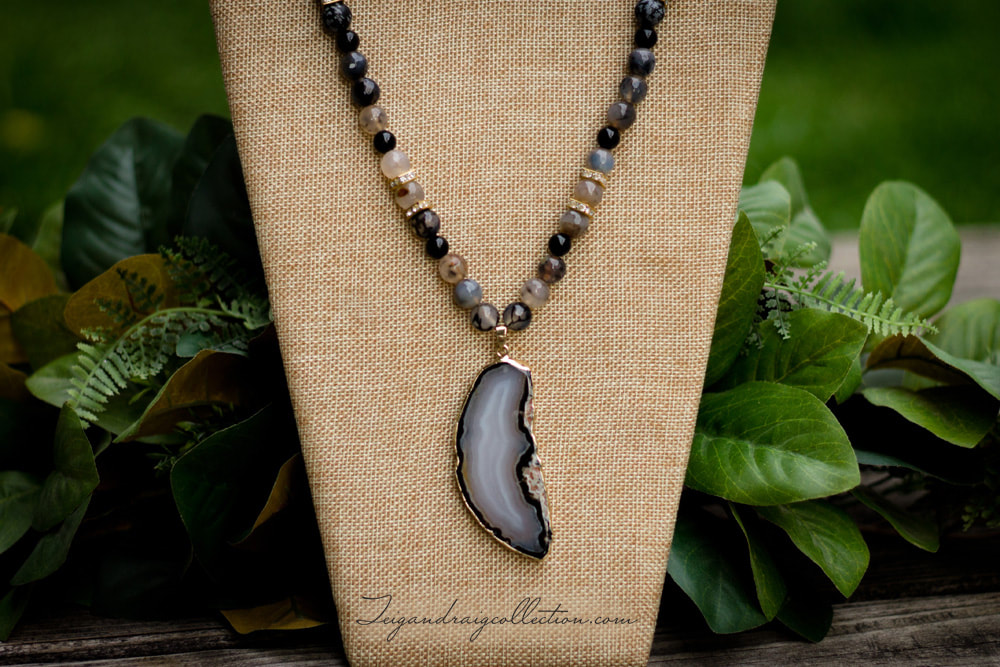
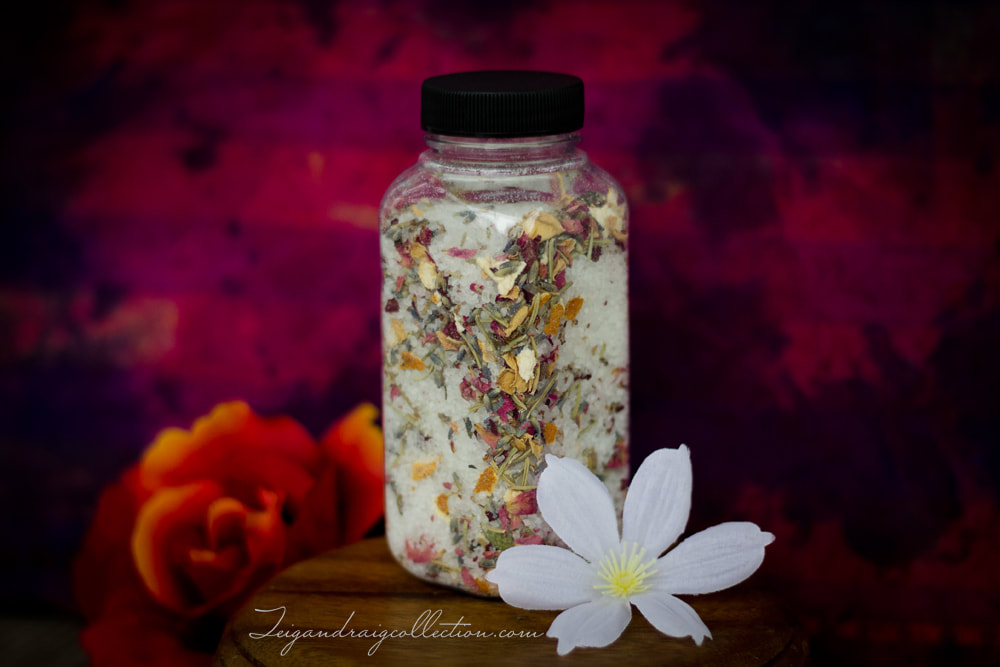
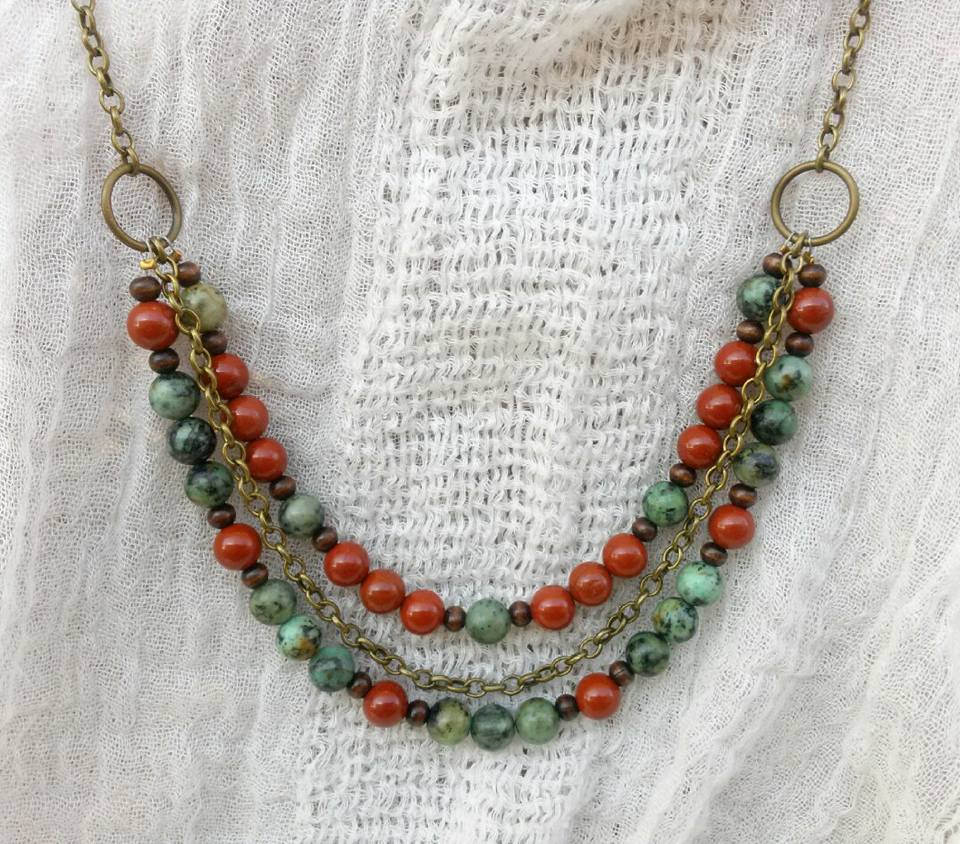
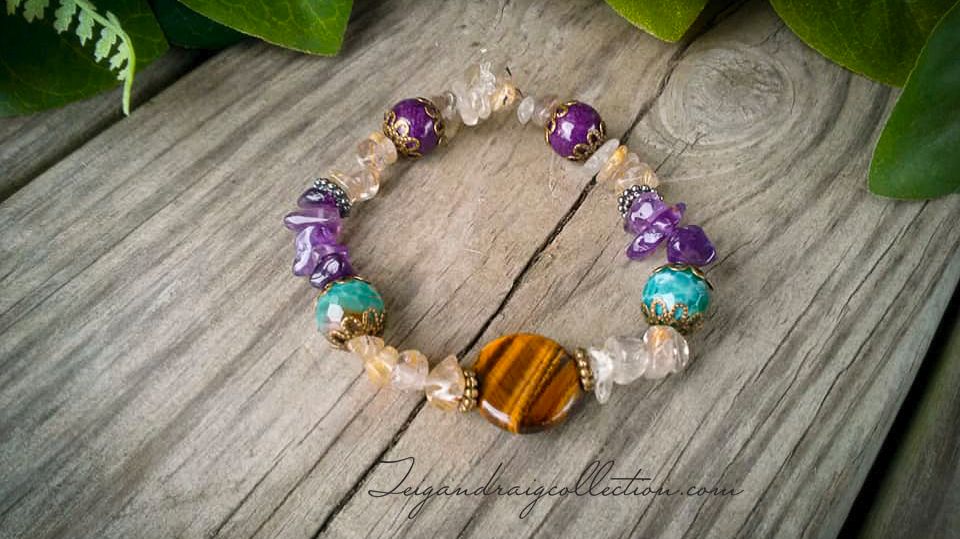
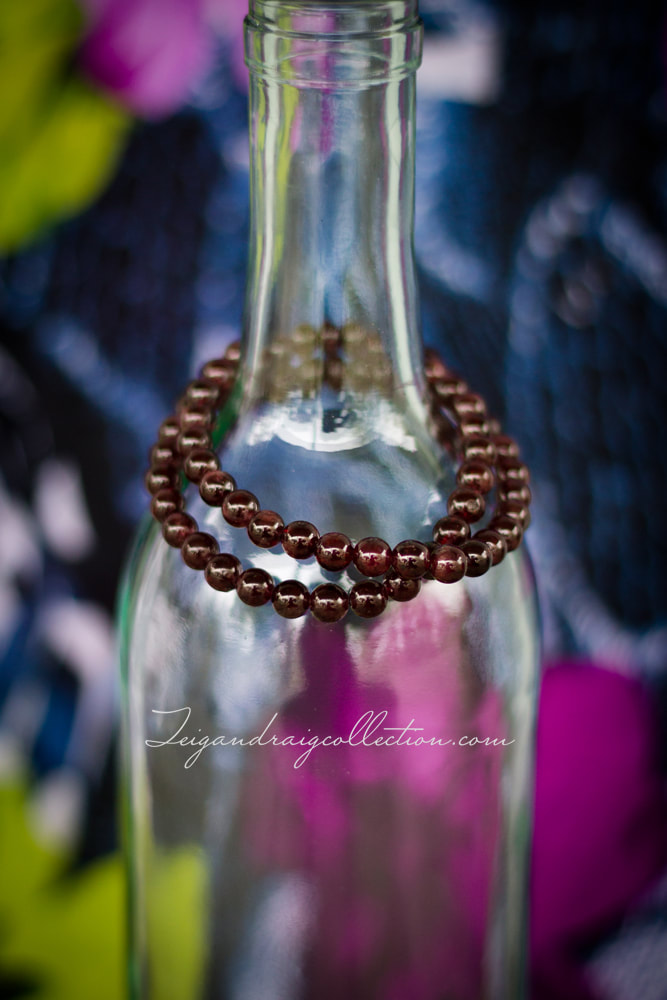
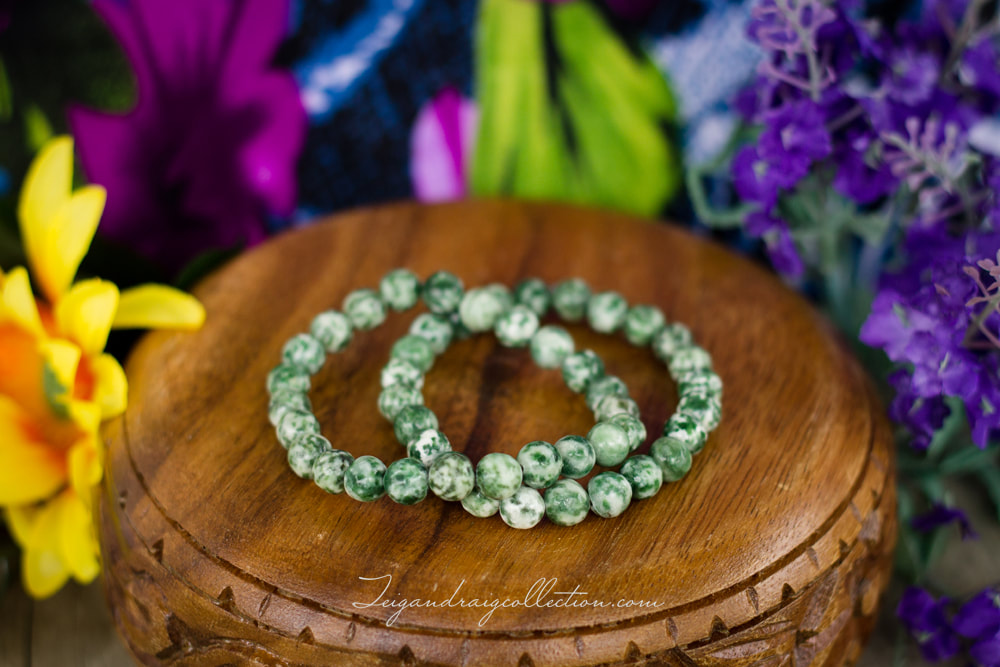
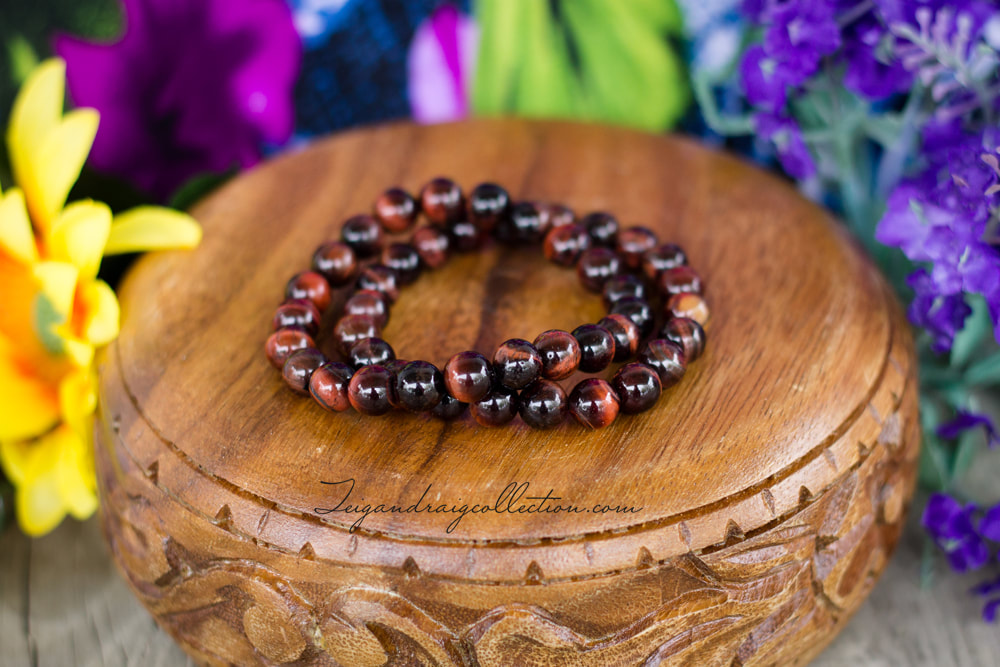
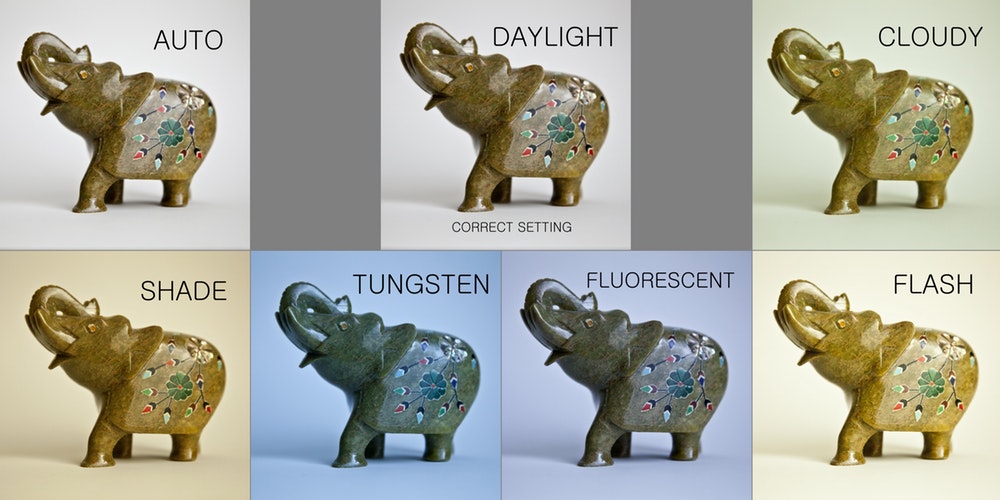 This image was shot in daylight, therefore the white balance setting was set to daylight. The other images show how incorrect white balance settings affect the color of the image. Controlling Light - Achieving Proper Exposure 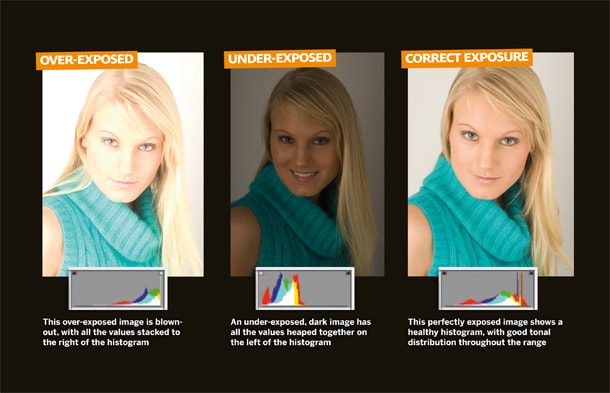  Proper exposure is governed by the exposure triangle, but as I mentioned earlier, I want to keep this relatively easy to follow and understand. I know many of my target audience are not using cameras with manual settings, or they just prefer to shoot in auto mode. A very simplified explanation of exposure issues is an image that is either too dark, or too light. See the image above for a break down of each. A properly exposed image allows the perfect amount of light in through the lens to reach the camera's sensor. It is well lit and not too dark and not blown out. A blown out image has highlight areas that are white or near white and lack detail because too much light was allowed to enter the lens and wash these highlight areas out. A blown out image can sometimes be caused by the use of flash when flash was not actually needed, the flash was too bright, or the camera was too close to the subject when flash was used. Using a flash to light a set up creates harsh shadows in the image which takes away from the aesthetic of the image. Bright diffused lighting is best. Diffused lighting is the same principle as the clouds diffusing the sun's light on a cloudy day. The light on a cloudy day is soft and produces muted shadows. Using a lightbox is a great way to properly light your set up and achieve a nice soft lighting. Proper lighting is crucial to achieving correct exposure. To avoid under exposure, make sure your subject is well lit. Using a light box or shooting outdoors in natural light can help with this. You can purchase a small light box or make one yourself. Making one is actually quick simple. Here is a simple tutorial on how to make a homemade light box. HOW TO MAKE A LIGHTBOX  Editorial Photography vs Product Photography Part of the fun of doing your own product photography is that you are in control of your style. It is up to you how you present your products. Some people prefer product photography that is clean and simple with products displayed against a white background with no props or other elements. This is called standard product photography. Then there are people, myself included, who prefer a more editorial approach to product photography. Editorial photography is a more artistic approach to product photography with the use of props and interesting background while still placing the focus on the product. The three photos below are examples of editorial product photography. There are some differing schools of thought when it comes to what style of product photography is best. I feel this is a personal decision. Standard product photography is simpler and less complicated to produce. Editorial photography is more time consuming, but allows you to be creative with how you present your products. As an artist first, I choose to use an editorial style photography to represent my products and my brand. When using an editorial approach to product photography, you must take care that your images do not not become cluttered and distracting with too many props and busy complicated backgrounds. What ever style you decide, just have fun with your photography. Keep your focus on the products you are photographing and you will do great!
I hope you have enjoyed this article and found it helpful in producing better product photography.
Brightest blessings! Teigan Draig If you are anything like me, you love to accessorize. I love to accessories according to the season. With summer right around the corner, I thought I'd share with you some of my favorite summer jewelry accessories. These are three of my favorite style combinations for you to try this summer. I'd always love to hear your thoughts, so please share them in the comments section below. What are your favorite style combos? Bold Earth Tones
 Summer Blues
 Stack 'Em Up
Thanks for stopping by! I hope you enjoyed this article. Please feel free to share it! Don't forget to leave your thoughts in the comments.
Brightest blessings! Teigan Draig |
AuthorTeigan Draig : Seeker of light, dragon tamer, woodland wanderer, butterfly queen, crystal collector, and matron to her young prince. Archives
July 2023
Categories
All
|


 RSS Feed